If you’re designing an app, website, or product, you’ve probably used wireframes to sketch screens or flowcharts to map out the paths a user may take while using whatever it is you’re creating.
Wireflows combine both. They show how your interface looks and how users move through it in one clear, connected diagram.
The whole concept is simple. But the impact? Once you see it in action, you’ll wonder how you ever explained a user flow without one.
In this quick guide, we’ll show you:
- What wireflows are
- When to use them
- How to build your own.
We’ll also share a few wireflow examples to help you get started.
What is a wireflow?
A wireflow is a simple way to visualize how users move through a product, or whatever you’re designing. It combines wireframes (the rough sketches of each screen) with arrows that show what happens when someone clicks, taps, or makes a choice.
For example, if you’re designing a food delivery app, a wireflow might start at the home screen, then show the user tapping on a restaurant, choosing a dish, and heading to the checkout screen, with arrows connecting each step.
Wireflows are important early in the design process. They make it easy to spot clunky paths, missing steps, or dead ends before moving on to full-blown mockups or prototypes. And because they’re simple to create and share, wireflows help stakeholders (regardless of their technical background) gain clarity on the concept before you write a single line of code.
When to use a wireflow
Wireflows are especially helpful when you need to show how your product works, not just what it looks like. They're ideal for:
- Sketching out a new product or feature from scratch
- Designing multi-step interaction flows like sign-up or checkout
- Aligning with stakeholders before jumping into high-fidelity design
- Spotting gaps or edge cases in existing user journeys
- Handing off flows to developers in a clear, visual way
Benefits of wireflows
Wireflows help teams design, communicate, and iterate on complex workflows more effectively. Instead of creating static screens for every possible interaction, wireflows use arrows and annotations to show how users move through the product. This approach keeps things simple while still capturing dynamic behavior and decision points.
Here are some other practical benefits:
- They make feedback gathering and iteration faster, since wireflows are quick to tweak and easy for non-designers to understand.
- They help you get buy-in from stakeholders early by showing a clear, visual path through your product.
- They support better resource planning by showing the full scope of what needs to be built.
- They act as living documentation—easy to share, update, and revisit as your product or goals evolve.
Anatomy of a wireflow
Now that you know what a wireflow is and when to use one, let’s walk through the core components of a wireflow. Don’t worry—it’s a short list!
Wireframe screens: These are the rough sketches of the key screens in your product, app, or website. They’re usually shown as boxes with basic shapes like rectangles for buttons, lines for text, and dropdowns or checkboxes to represent interactions.
Arrows: These connect the screens and show how users move from one to the next. Straight lines indicate simple navigation, while branching arrows can show decision branches or alternative paths.
Notes and annotations: Easily provide helpful context to explain things like button behavior, system feedback (like error messages), or any behind-the-scenes logic you want to capture. These are usually shown as callouts, sticky notes, or small text labels next to the wireframes.
Here’s how it all comes together in a wireflow👇

Wireflows vs. wireframes vs. flow diagrams: What’s the difference?
By now, we’ve talked a lot about wireflows. But they’re not the only kind of design diagram out there. You’ll often come across regular wireframes and flow diagrams, too.
We’re bringing them into the mix so you can see how they all relate—and what makes wireflows unique. Here’s how they compare side by side 👇
| Feature / Use case | Wireframe diagrams | Flow diagrams | Wireflows |
|---|---|---|---|
| Best for... | Sketching screen layouts | Showing steps or decisions in a process | Communicating layout and flow in one view |
| Visual layout of screens | ✅ Yes | ❌ No | ✅ Yes |
| User actions and screen transitions | ❌ No | ✅ Yes (as arrows, logic branches) | ✅ Yes (via arrows between screens) |
| Level of detail | Low to mid fidelity | Abstract (shapes, symbols, steps) | Low fidelity + clear screen visuals |
| Ideal stage of process | Early design / concept exploration | Planning flows and decision trees | When you want to show how your interface behaves before prototyping |
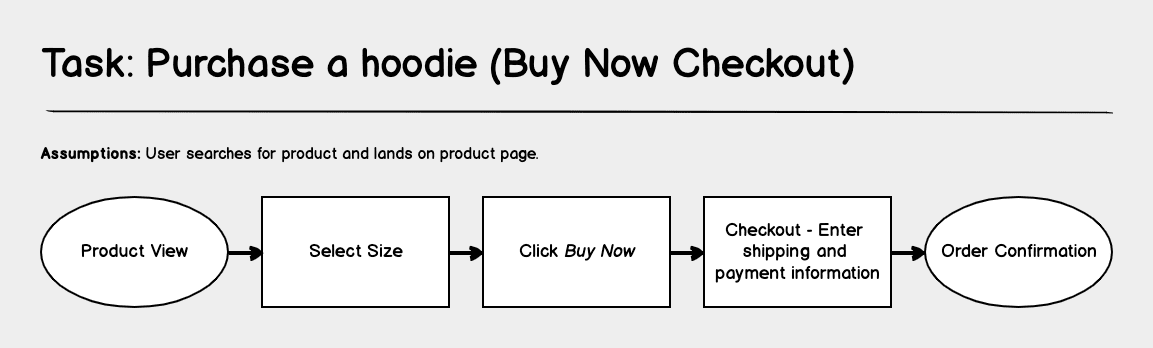
| Example | A product page wireframe with “Add to Cart” button | A task flow for “Buy a hoodie” with decisions and arrows | A sequence of wireframes showing user sign-up in a meal planning app |
| Clarity for non-designers | Medium – depends on context | Medium – can be abstract | High – very easy for stakeholders to follow |
Wireframes
Wireframes are rough, static schematics created early in the design process to help teams explore, visualize, and communicate ideas. They map out the structure and layout of a product or feature before getting into any visual design decisions.
There are two main types of wireframes:
- Low-fidelity wireframes are basic shapes, grayscale colors, and placeholder text to focus on layout and functionality without getting distracted by visuals.
- High-fidelity wireframes are more detailed and closer to the final design. They may include real content, precise spacing, and early visual styling to show how the interface will actually look and work.

Most early-stage wireframes are low-fidelity by design. They’re fast and easy to create, which makes them great for idea testing, making quick changes, and even starting over without too much effort. If you’re looking for a practical starting point, this five-step guide to creating wireframes is a helpful resource to walk you through the basics.
To see a real-world wireframe in action, watch the video below.
Flow diagrams
Flow diagrams map out steps and decisions, such as choosing between two actions or outlining what happens when something goes wrong. They’re great for showing how a user will move through a task or system.
However, they don’t show what the interface looks like. Instead, they focus on logic and flow. So, when deciding which one to use, there’s no right or wrong answer. In many cases, you might need to use all of them! Wireframes, flow diagrams, and wireflows each have their place. But, when you use them together, you’ll have a more complete picture of how your product works, how it behaves, and what users’ pathways look like.
A step-by-step guide to creating your first wireflow
Okay, let’s make your first wireflow. Follow these key steps to get it right from the very start.
Step 1: Start with words
Before you start drawing anything, you need to do some thinking and writing. Step into your users’ shoes and ask yourself:
- What are they trying to do?
- What’s the simplest path to get there?
This could be a task like “Sign up for a new account” or “Buy a hoodie.” Think about what happens first, what comes next, and what decisions or changes might pop up along the way. It can be helpful to write it out like a short user story or task flow.
"When building wireframes, I sometimes like to add notes and a list of requirements at the top of the very first wireframe. That way, those reviewing my wireframe have all of the context they need about the project before they review and provide feedback."
Step 2: Sketch your key screens
Next, start thinking about the key screens in your interface. A helpful way to do this is by identifying the starting and ending points of a task. In the “buy a hoodie” example, the starting point might be a product page, and the ending point is the order confirmation screen.
Focus on the screens where something in the interface changes, like when a form appears, a selection is made, or a message is shown. For instance, during a checkout flow, you might have separate views for entering contact info, shipping details, and payment information. Each of those steps would need its own screen.
💡 Tip: Don’t worry about making these sketches pretty. Using boxes, labels, and simple controls will do just fine. The whole point of this stage is to capture the structure.

Step 3: Connect the screens
Now it’s time to connect your key screens together. Use arrows to show how a user moves from one screen to the next. These connectors help define what happens in between steps and guide the user through the task.
You can also include decision points, such as what happens if the user clicks “Back” instead of “Continue” or enters something incorrectly. These paths help you catch gaps or edge cases early and make your flow more complete.
Step 4: Review and refine
Once your wireflow is mapped out, your job isn’t done just yet. Step back and look at the big picture. Does the journey make sense? Are there any missing steps or dead ends? Is anything clunky or confusing?
Share your wireflow with teammates or stakeholders and invite their feedback. Since wireflows are low-fidelity and easy to update, this is the ideal time to make changes—before you invest time and resources into mockups, prototypes, or code.
Don’t be afraid to iterate. That’s the beauty of working rough and early.
3 Wireflow examples to get started
Wireflows are one of those things that make more sense once you see them in action. Here are a few user flow examples—straight from Balsamiq—to help you get the hang of it.
1. Mobile app user flow
First, we’ve got a mobile app user flow, which outlines the first-time user experience for a simple cat photo-sharing app. It starts with the home screen, then walks through sign-up, account creation, and the user’s very first post.
The wireflow shows each screen in sequence and includes important branches, like what happens if you enter the wrong password. Arrows guide you through every tap and action, giving a clear picture of how users move from the sign-up screen to sharing their first cat photo.
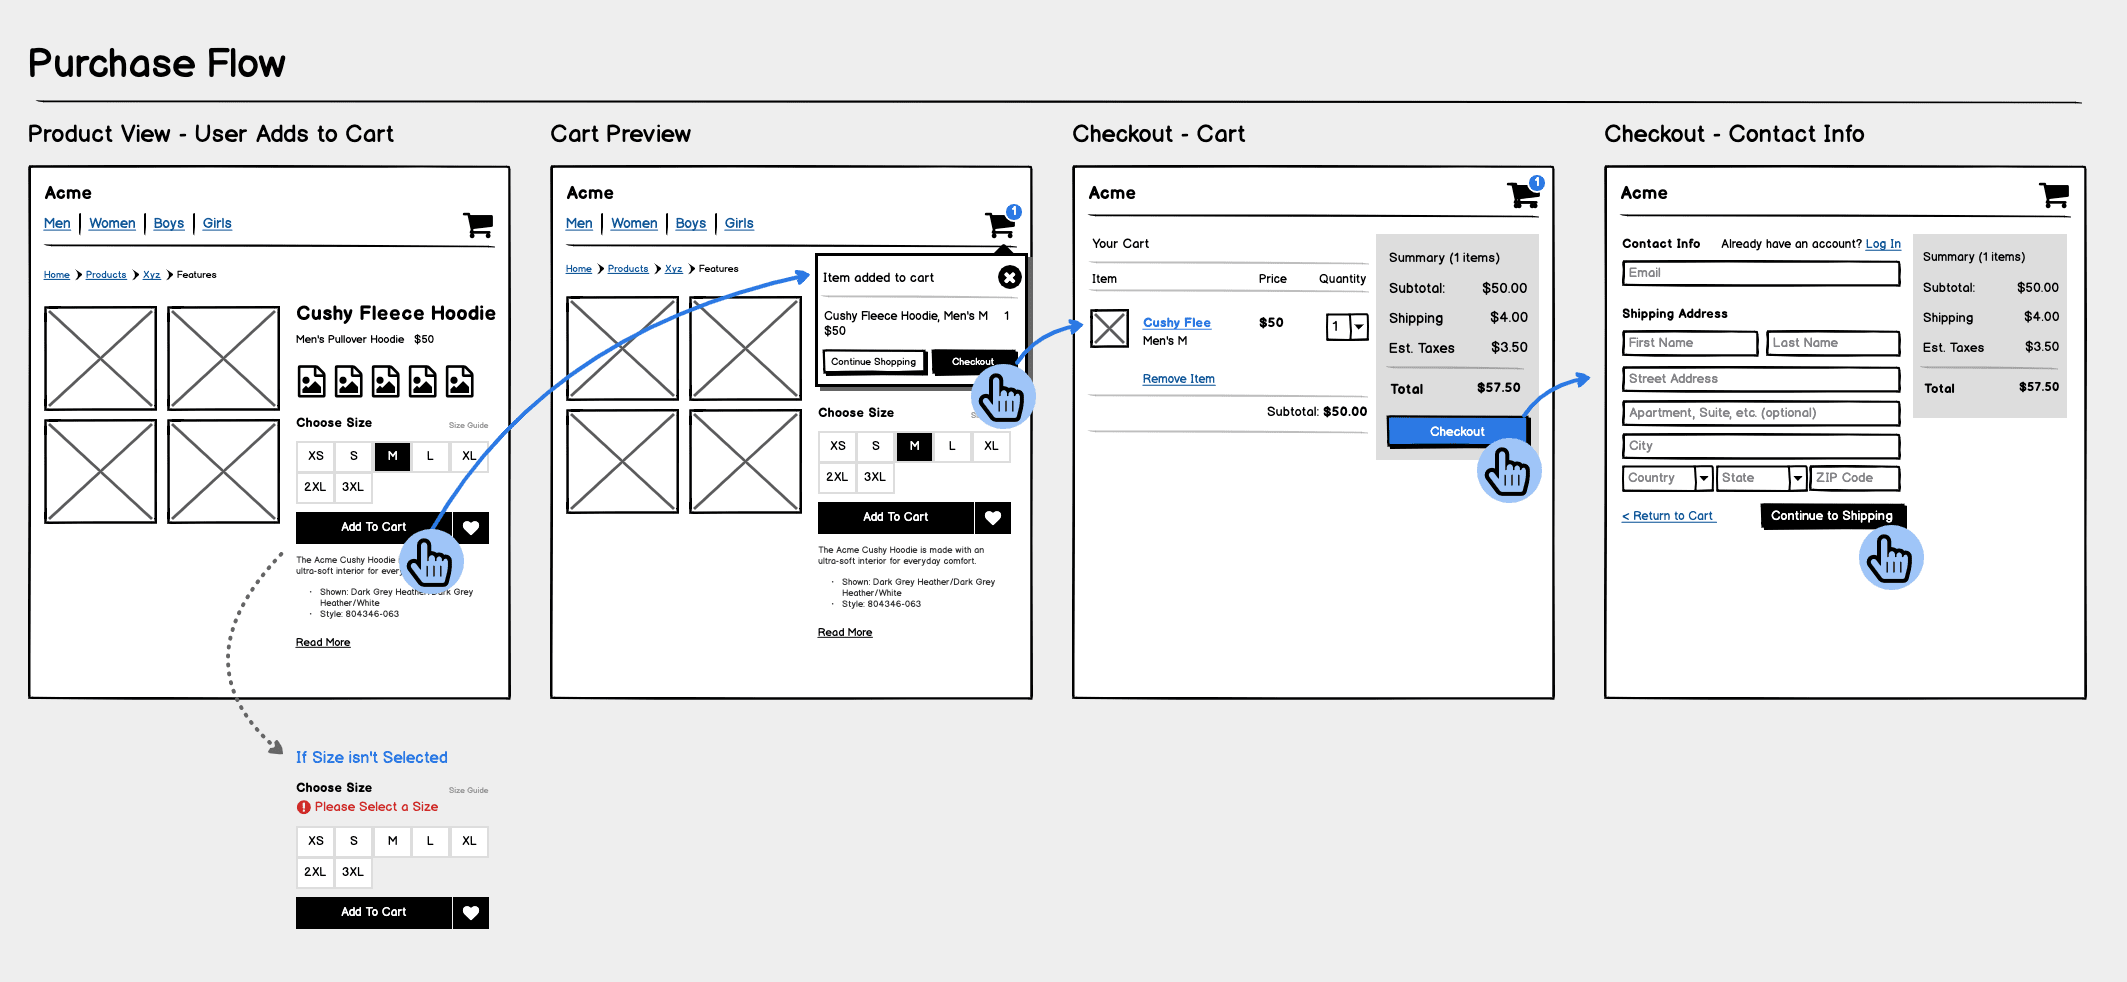
Another example is a user authentication flow, which is something almost every app needs.
This wireflow shows how a user verifies their identity after signing up, including entering a code, resending a verification email, and recovering from common errors like using an already-registered address or entering the wrong code.
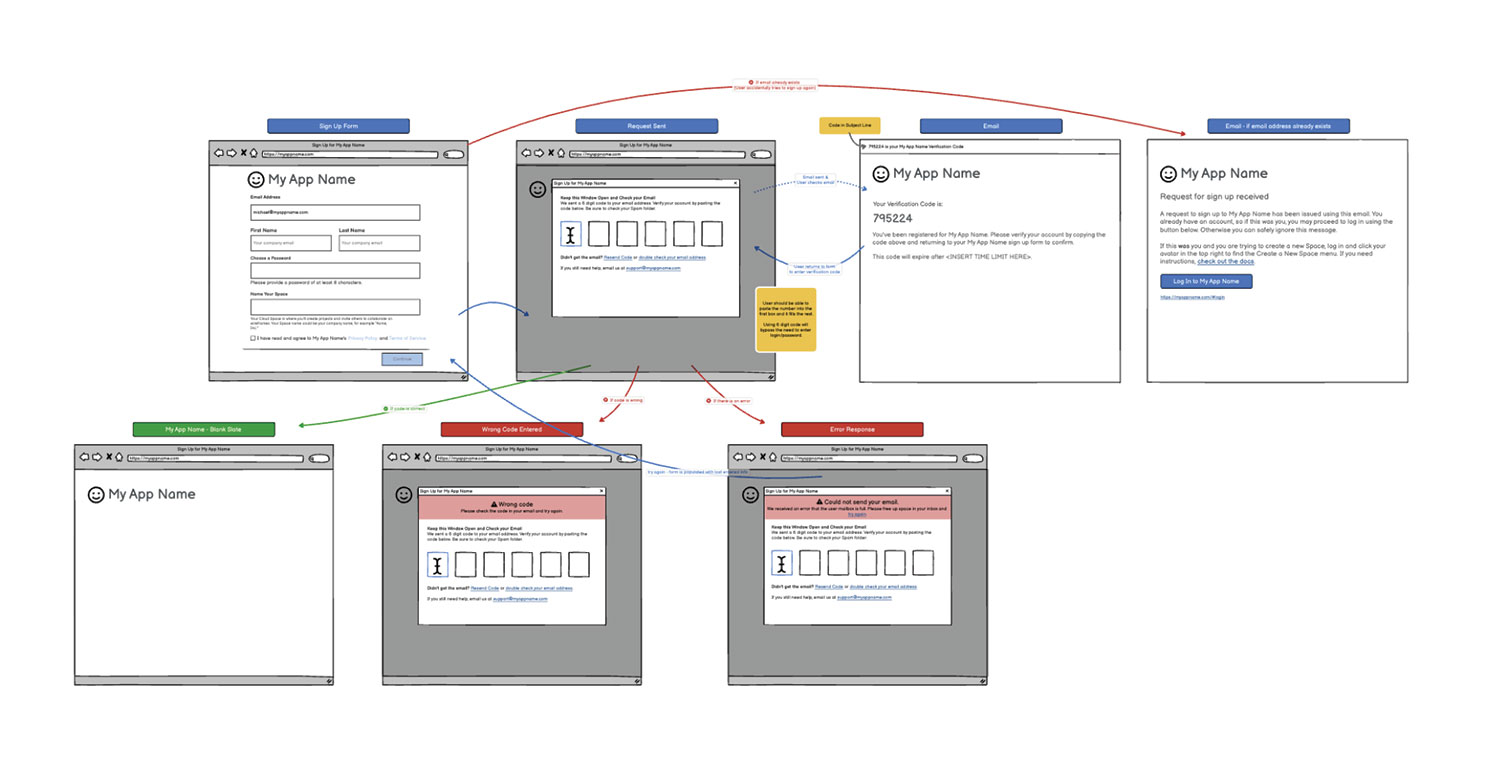
👉 If you’re looking for a complete sign-up flow example, check out our in-depth walkthrough of the Balsamiq Cloud wireflow. It shows how we approached each screen, step by step.
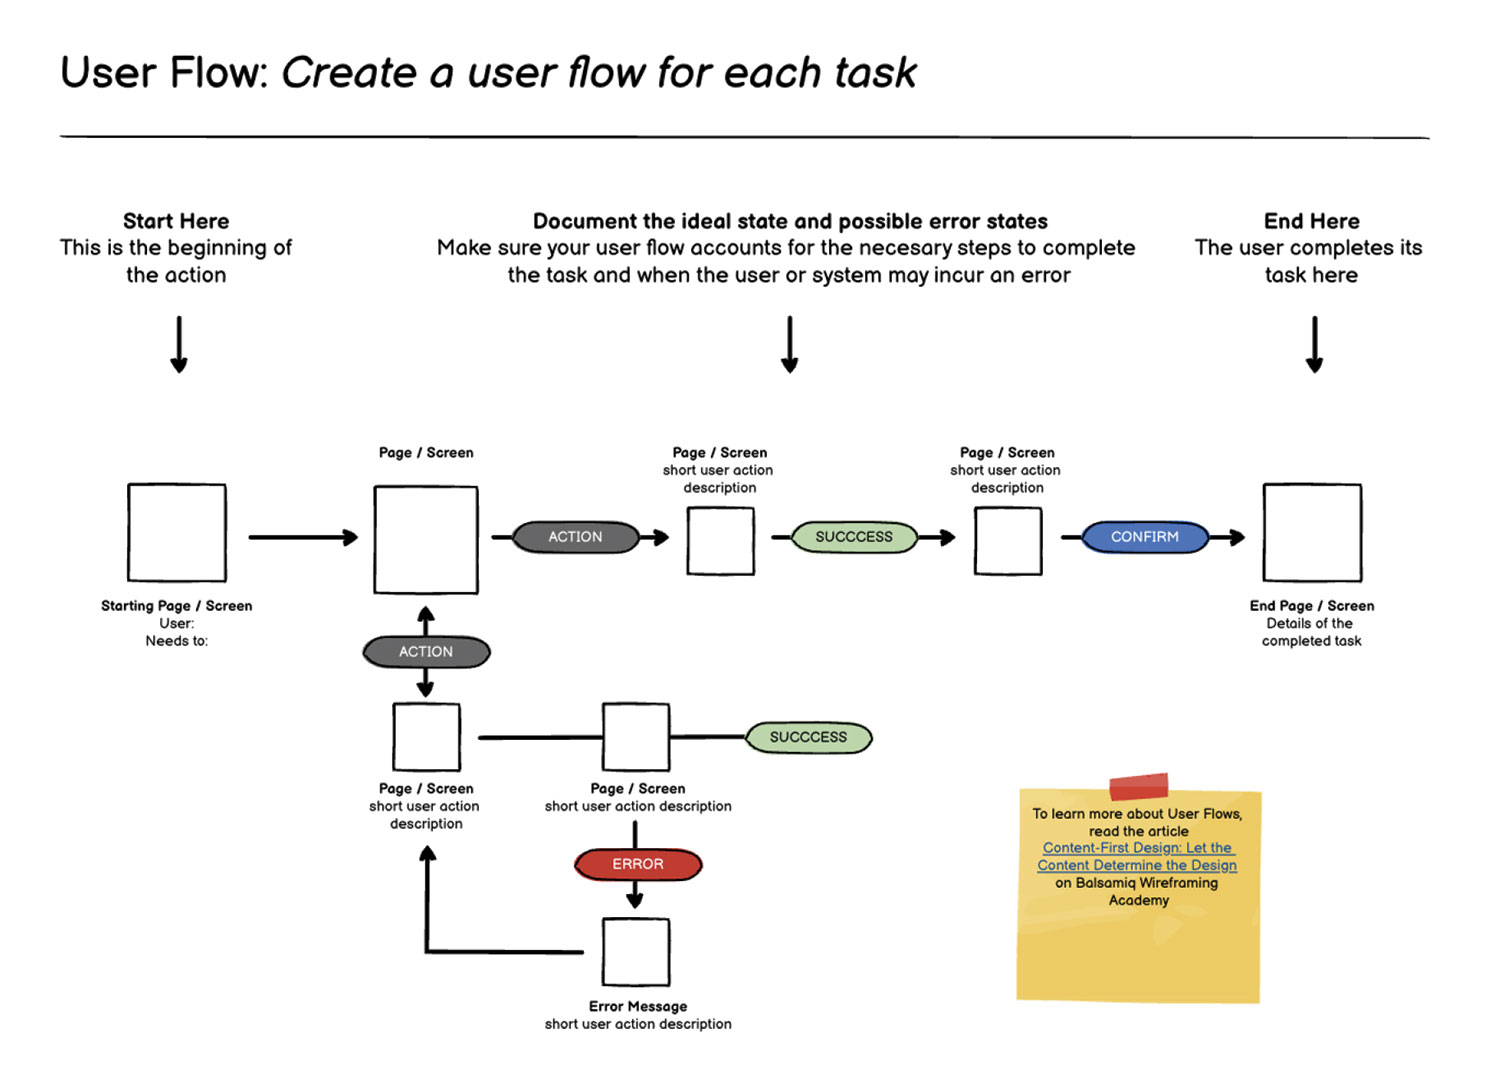
3. General user flow example
If you need a general flow for whatever you're creating, this one’s a great place to start. It walks through a full user task from the first screen all the way to the final confirmation. Along the way, it includes common steps like taking an action, hitting an error, trying again, and eventually succeeding.
This kind of wireflow helps you think through not just the ideal path, but also the “what-ifs”—so your team can catch gaps early and build something that really works for your users.
How Balsamiq helps you build wireflows fast
Balsamiq was built for speed and simplicity, so you can focus on your ideas instead of fiddling with design tools. Whether you're sketching out a new feature or mapping an entire product flow, Balsamiq makes it easy to bring your wireflows to life—fast.
You can start from scratch or make use of built-in templates and the Wireflow Elements Library, which includes reusable screen shapes, connectors, and common UI patterns to speed things up. Just drag, drop, and adjust to fit your needs.
The good part? You don’t need to be a designer to use it. With a zero-day learning curve, Balsamiq is made for product managers, developers, and founders—anyone who needs to figure out how something should work and explain it to others.
We even have our very own Balsamiq Academy, where you can learn the basics of wireframing, wireflowing, and everything in between.
FAQs
What's the difference between a wireframe and a wireflow?
A wireframe shows the layout of a single screen. A wireflow connects multiple wireframes to show how users move from one screen to the next. It's like zooming out to see the whole journey, not just one stop along the way.
When should I use a wireflow instead of a user flow diagram?
Use a wireflow when you want to show both the structure of each screen and how users navigate between them. It's especially helpful when presenting to stakeholders who need to see the interface and the logic behind it.
Do wireflows need to be high-fidelity?
Not at all. Wireflows are most effective when they're low-fidelity. The goal is clarity, not polish. Sketch-style wireframes with arrows and labels are perfect for early-stage planning.
Can wireflows help with usability testing?
Yes! Wireflows give testers a clear sense of how users are expected to move through the product. They help identify confusing transitions, missing screens, or dead ends before you invest in full design or development.
What tool is best for creating wireflows?
If you want to keep things fast and low-fidelity, choose Balsamiq. You can sketch screens, connect them with arrows, and iterate quickly without getting bogged down in visual details.