Agile User Stories are great because they focus on user needs and are short and decipherable, unlike functional specification documents. But they often lack details that front-end developers need to design the user interface. In this article we'll learn how wireframes and User Stories can work together to provide adequate information without unnecessary effort.
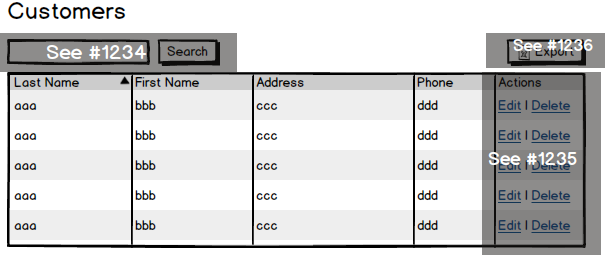
Imagine that you've come up with a design that allows users to view a list of customer demographic information. Something like this:
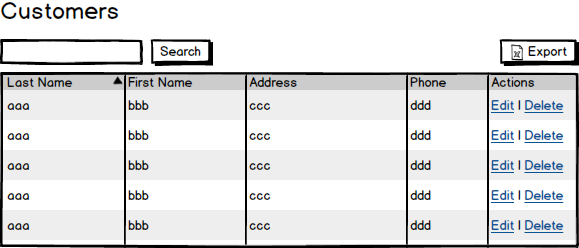
It's tempting just to drop this into a User Story and say "build this." But it's important not to discount how much information is in your head about how this relatively simple page should function. There are some gaps that need to be filled in for the developer who's going to be building it. But don't under- or over-think these gaps. To find the right balance, take advantage of the 80/20 rule.
There's no question that developers need detail in User Stories. Wireframes are great because they will get you 80% of the information that you need to communicate with 20% of the effort of a more interactive or pixel-perfect tool. So, don't spend 80% of your effort on that last 20% of the detail, just describe it using plain language in the User Story (I'll describe how later).
The goal is not to have a huge, impressive-looking specification or prototype, the goal is to ship a product that allows your users to accomplish their goals.
Your User Story should be just enough to get it built successfully. Any effort beyond that is a waste.
Step 1: Break up the design
What often surprises product managers is how long it takes to develop user interfaces. A lot of that frustration is due to a lack of understanding about how user interfaces are actually built. There is rarely a correlation between how long it takes to design and how long it takes to build. That's why it's useful to divide up the design into smaller chunks.
Even this simple design can be broken down into pieces. Pieces, it should be noted, that can be delivered individually (as long as an order is obeyed). You can't deliver an incomplete feature, but you can deliver a small part of a larger feature. There's a difference. A button that doesn't do anything when you click it is incomplete. A data table that you can view but not edit, for example, can stand on its own.
Here's how you might break this feature up into pieces:
- The table and its content
- The search field
- The edit and delete functionality
- The ability to export
Note that, in that order, they can be delivered, and even released, in pieces. A table that doesn't have search may not be as useful as one that does, but it's still contributing towards the original feature requirement. Each Story should add some amount of value, however small, for the customer.
Note: Just because you're going to break up your work doesn't mean that you should think this way during the design phase. The value of wireframes is that they allow you to easily get what's in your head onto the page. And, more often than not, what's in your head is at a high level. So, go with it, and design what's in your head. Don't worry about the Story writing when you're designing.
Step 2: Order, prioritize, estimate
A note about the ordering of the Stories. The important thing when breaking up a design into pieces is to find the foundation, the piece that other pieces will be built upon. In this case, a logical choice is the table itself. You could argue that this is also the most important piece of functionality. The foundation often is. This should be the first Story you write.
Writing the most important Stories first helps ensure that the most important features get delivered. With fixed release dates and shifting agendas, never assume that everything will get shipped. Start with the important stuff and you'll at least be maximizing the value of your time.
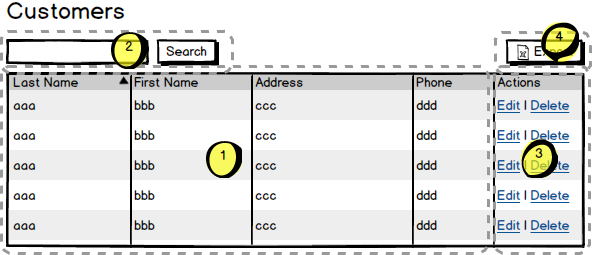
When you insert the wireframe into the User Story (as an embedded image, attachment, etc.) you don't have to remove the other pieces of it. One of the things you can do is show the full wireframe that you created, but obscure the parts that don't apply to the specific Story. That way, it's clear what the objective of the Story is, but you're also keeping in focus the end goal.
You might do something like this, for example:
One benefit of breaking up the design like this is that now you can get estimates on each of the pieces (and the wireframes alone should be enough to get estimates), which should not only be more accurate, but can be divided up across sprints. Let's say that after the estimation meeting the point values end up something like this:
- Table with customer data - 2 points
- Edit and delete functionality - 4 points
- Search - 1 point
- Export - 3 points
This will allow the product owner to make better cost-benefit decisions about the overall set of features. Maybe the export function is something that one noisy customer keeps asking for but that you know won't be used by most of your customers. Seeing that this piece is relatively more "expensive" than some of the other pieces might prompt you to put it off until the next release. This wouldn't have been possible if all you had was a 10-point estimate for the whole design.
We've actually come a long way already at this point. But don't stop there, there's one more step!
Step 3: Write the "recipe"
The final phase is to use the wireframe to help you figure out the details that the developers need to know to build it. A trick I learned to do this is to imagine yourself using it. Wireframes clarify the picture in your head of what you're building and allow you to picture its use. This process is helpful in providing the details that the developers want in order to building it.
Creating a wireframe is kind of like cooking something. Think about cooking your favorite dish. Now, think about writing a recipe for how to cook what you've made. It's a different process entirely. It's shifted from creating to communicating. It's all about putting yourself in their shoes and not making too many assumptions about their level of understanding or knowledge.

The lesson here is that the process of creating the wireframe is actually more for you than for the developer. It helps you figure out what you want to build, which, in turn, makes it easier to communicate how to build it (even if you're completely non-technical).
The structure of a User Story is often the following:
- Summary/Story Narrative
- Wireframe
- Acceptance Criteria
Note: I like to include the "why" of what we're building in the Story Narrative section and explain what value this feature provides. Believe it or not, developers care about this. And this explanation should pass their "smell test" too. If you can't get them to "buy into it", maybe you should revisit why you're doing it.
The third part is Acceptance Criteria (also called Conditions of Satisfaction, Acceptance Tests, etc.). This section is both for the developers and the testers. Here is where I think it's OK to take a bit of liberty with the traditional format. I like to think of this section as the recipe part.
Here is where you, to the best of your ability, tell the developers how to build it. Don't worry if you have a hard time with this at first, one of the benefits of this process is that it helps you learn what information developers need to build things. It opens the window into the development process, which benefits everyone.
Again, here we start with a foundation. Don't be afraid to get very basic. You might start, for example, with "Create a table with the following columns: Last Name, First Name, Address, Phone". Small pieces make it easy to check things off, and often actually correspond to the chunks of code the developer has to write.
Now that you can see this table with customer information in it, picture using it. Aside from the features that you've deliberately split off into other Stories, what might you, as a user, see and do here? Can you sort columns? If so, all columns, or just some of them? Anything that you can come up with along these lines is most likely information that the developer needs to know.
As a bonus, if you're somewhat technically savvy, you might be able to think of other things the developer might want to know. You might know that address data is stored in separate database fields (street, city, state, zip, for example). If you don't specify, the developer may create separate columns in the table for each of these, because that's how they see "address". But, you may know that users prefer to see these fields together (maybe so they can easily copy and paste them all at once). So, add to your recipe that the address field should include street, city, state and zip together.
But, also, realize then that users probably won't be able to sort the table by city, for example, because "city" is not a distinct column in the table. Product managers often want it both ways. Being forced to write the recipe yourself doesn't allow for that. It's a trade-off: do you want a more human-readable address field, or do you want to be able to sort by each part of the address? It's up to you. This is not the developer's problem.
For this particular Story, here's what your acceptance criteria might look like, just to give an idea of some other possible details you could include.
Acceptance Criteria:
- Create a table with the following columns: Last Name, First Name, Address, Phone
- Add a level 3 heading title above the table with the label "Customers"
- The Last Name, First Name, and Phone columns should include the last name, first name, and primary phone number fields, respectively, for each customer
- The Address column should be comprised of the following fields (in this order): street, city, state (abbreviated), and zip code (5 digits only). Wrap the text to the next line at 100 characters.
- By default, order the table by customer's last name (ascending)
- Allow the table to be sorted by last name or first name
- Add pagination at 25 rows
See how many details there can be for a simple 4-column table?! The takeaway here is not how hard it is to build this table (it may take only 30 minutes if you already have a table framework in place), but how many decisions need to be made when building it. And that, if you don't specify them, those decisions will either be made by the developer or the framework you're using. As in many cases, not making a decision is making a decision.
At this point, you should show the Story to the development team for a reality check, make any modifications necessary based on their feedback, and put it in the development queue. That's it! Then, on to the next Story... 😉
A few final tips
- Sometimes you'll want to make minor tweaks to the Story after the wireframe is done (label changes, etc.). Even though updating the wireframe is easy, I often just update the text of the Story. I make it known that if there's a discrepancy between the text and the wireframe, always follow what the text says.
- Be casual in your language. Write like you would write for someone who's looking after your dog while you're away. Don't be afraid to write things like "the styling should look like our other tables" or "work with the graphic designer to create an export icon". Only include as much detail as necessary. Ask the developer if anything is unclear to them.
- Every developer is different, so you may end up changing the level of detail based on your team. Some just look at the wireframe, some go straight for the acceptance criteria. Some improvise when details are missing, others refuse to continue until they get clarification. Try to learn their styles and preferences. Ultimately, try to take responsibility for making your Story clear and easy to understand.
Webinar: How to Use Wireframes With Agile User Stories
Watch the recording of our webinar about using wireframes with Agile user stories.